
Cook and Clean for an Entire Week in 2.5 Hours
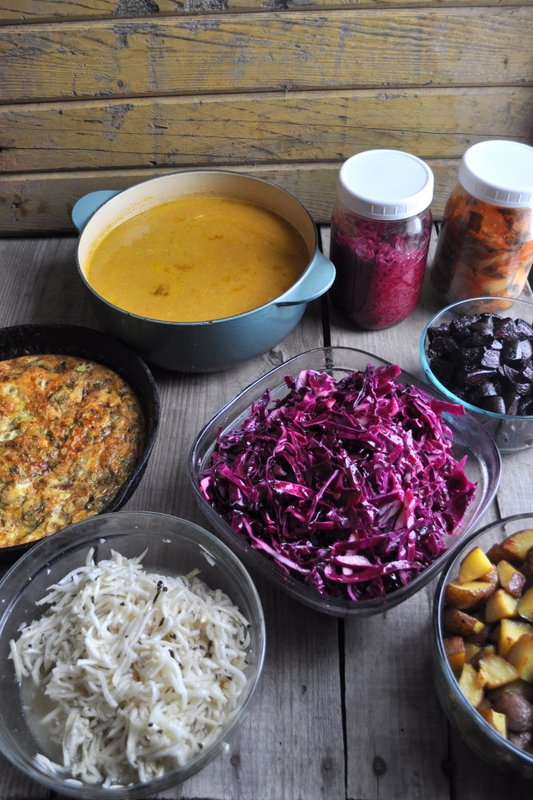
Clockwise from top: Carrot bisque with coriander, purple sauerkraut, kimchi, roasted beets, purple coleslaw, roasted potatoes, turnip + black radish slaw, frittata with potatoes + ham.
Our family doesn't necessarily like to eat all the same things. We don't always sit down to eat at the same time. We do eat a lot of vegetables. And we don't have a lot of time to cook.
Minus the salad greens, the photo above shows what approximately a medium vegetable share from our farm looks like when prepared all at once. It took me about two hours to prepare and cook this, with another half hour for the soup and frittata to finish up. In that half hour, I washed up the dishes. For the entire week.
And now I am done!
It will probably take our family of four a little less than a week to eat all this. During that time, there won't be any dishes to wash beyond our cups and eating plates. It's all portable, so if we need to leave home for a meeting or a CSA pick-up, it's easy to pack away in travel containers. I can feel good about the fact that it's a 98% local, organic, plant-based, whole foods set of options. Perhaps best of all, our children can choose from an array of dishes, so the dinner table is a happier place. And I don't need to worry about making time to pull off a balanced meal in the midst of everything else that takes place on a full December evening.
Materials
2 cookie sheets with rims
parchment paper
a food processor
immersion blender
Dutch oven
cast iron frying pan
glass storage containers
Mason jars with lids
How it Gets Done
Pots and Stuff
I love cooking, but I hate doing dishes. Therefore I try to prep straight into the storage containers that will go from fridge to table—or in the case of the frittata and soup, from stovetop to oven to fridge to table. I'll snap lids over these containers and won't wash them again til they're empty.
Parchment Paper + Cookie Sheets
Almost all winter vegetables like getting chopped and thrown into the oven. I like that you can get 2 trays going at once. Before I even broke out the food processor today, I chopped the potatoes and then the beets (same cutting board, no peeling), and started the oven at 400 degrees.
The quantities pictured in the photo above equal about 2 Bluestem Farm winter CSA share bags of beets and almost a full bag (not a quart, a bag with the handle) of potatoes. If our family was trying to plan for 2 weeks of food instead of one, we'd need twice as much of those things.
Food Processors
I love my food processor. I don't love to clean it. We've reached a gentlemen's compromise: I use it only about once a week, and during that time, I try to prep absolutely everything.
In the photo above, the food processor chopped everything except the potatoes and beets. Starting with the radishes and turnips in the white slaw, because they are white, I prepped each vegetable, then rinsed out the bowl and switched out the blade for each new recipe. Using the slicing blade, I prepped the cabbage for the purple coleslaw and purple sauerkraut. Last, I used the S-blade to mince the carrots and onions for the soup before cooking them. Why use a food processor for that?
Small carrots cook faster, and I was going to puree them in the end, anyway.
Staple Supplies + Other Timesavers
I'd say the menu pictured is about 98% Bluestem Farm food. I did use a few staples prepared in advance of today's cooking excitement, however.
1) Chicken broth. Our stewing hens make the most flavorful, most nutritious, most helpful kitchen substance I know of. I often say I wouldn't know how to cook without a supply of great chicken broth on hand.
2) Ham from a hock. Earlier this week, I made ham and potato soup, another thing I like to cook when I don't have energy to think about cooking. The hock I originally made was too large and meaty for the soup, so I squirreled it away in the fridge for later. A frittata is often my "later."
3) Nice vinegar. Someone once gave me some Fustini's vinegar, and now I regularly pay the extra money for it. It's worth it.
4) Store-bought oils, coconut milk (for the soup), and dried spices.
The Recipes
Carrot Bisque with Coriander
2 yellow onions
1 tablespoon coconut oil
2 bags rainbow carrots, purple carrots removed (and used in green salads later)
1/2 teaspoon ground coriander
1 quart chicken stock from a stewing hen
12 ounces coconut milk
3/4 teaspoon green salt, or any sea salt
Chop and saute the onions in all the salt and the coconut oil until they're tender. Meanwhile, mince the carrots with the S-blade of a food processor. When the onions are ready, dump in the carrots and brown them a minute or two on medium-high heat. Add the chicken stock and coconut milk and simmer until done. Use an immersion blender to finish pureeing the soup.
Purple Sauerkraut
2 pounds purple cabbage
1 rounded tablespoon of fine sea salt
Shred the cabbage, toss it with salt to coat, then mash and squash and knead the cabbage until its juices will cover it when packed tightly into a wide-mouth quart mason jar. Leave the jar on the counter at room temperature. Wait about a week. then taste.
Mason Jar Kimchi
I'm going to go ahead and admit that I made the kimchi in advance. Cheating!
This version is a mix of favorite recipes found online at places like chow.com and thekitchn.com, but is mainly by Emily Ho, a writer and recipe developer who teaches classes on food preservation, wild food, and herbalism. She is a Master Food Preserver and founder of the LA Food Swap and Food Swap Network.
1 (2-pound) head Napa cabbage
1/4 cup sea salt or kosher salt
water
1 tablespoon grated garlic (about 5-6 cloves)
1 teaspoon grated ginger
1 teaspoon sugar
2-3 tablespoons fish sauce or water and seaweed powder
1-5 tablespoons Korean red pepper flakes (gochugaru)
8 ounces Korean radish or daikon, peeled and cut into matchsticks
4 scallions, trimmed and cut into 1-inch pieces
Cut the cabbage. Cut the cabbage lengthwise into quarters and remove the cores. Cut each quarter crosswise into 2-inch-wide strips.
Salt the cabbage. Place the cabbage and salt in a large bowl. Using your hands (gloves optional), massage the salt into the cabbage until it starts to soften a bit, then add water to cover the cabbage. Put a plate on top and weigh it down with something heavy, like a jar or can of beans. Let stand for 1-2 hours.
Rinse and drain the cabbage. Rinse the cabbage under cold water 3 times and drain in a colander for 15-20 minutes. Rinse and dry the bowl you used for salting, and set it aside to use in step 5.
Make the paste. Meanwhile, combine the garlic, ginger, sugar, and seafood flavor (or 3 tablespoons water) in a small bowl and mix to form a smooth paste. Mix in the gochugaru, using 1 tablespoon for mild and up to 5 tablespoons for spicy (I like about 3 1/2 tablespoons).
Combine the vegetables and paste. Gently squeeze any remaining water from the cabbage and return it to the bowl along with the radish, scallions, and seasoning paste.
Mix thoroughly. Using your hands, gently work the paste into the vegetables until they are thoroughly coated. The gloves are optional here but highly recommended to protect your hands from stings, stains, and smells!
Pack the kimchi into the jar, pressing down on it until the brine rises to cover the vegetables. Leave at least 1-inch of headspace. Seal the jar with the lid.
Let it ferment. Let the jar stand at room temperature for 5 days or longer. You may see bubbles inside the jar and brine may seep out of the lid; place a bowl or plate under the jar to help catch any overflow.
Check it daily and refrigerate when ready. Check the kimchi once a day, pressing down on the vegetables with a clean finger or spoon to keep them submerged under the brine. (This also releases gases produced during fermentation.) Taste a little at this point, too! When the kimchi tastes ripe enough for your liking, transfer the jar to the refrigerator. You may eat it right away, but it's best after another week or two.
Roasted Beets
Here's a friendly method. I use refrigerated, leftover beets in green salads. This time of year, they kind of fill the role of summer tomatoes.
Roasted Potatoes
I like to parboil potatoes in salty water before roasting them. (I don't do that with beets.)
Leftover potatoes have the gift of being lower on the glycemic index than freshly cooked potatoes.
Black Radish + Turnip Slaw
5-6 white roots (daikon, salad turnips, Spanish black radishes)
2/3 teaspoon green salt, or any sea salt
2/3 cup neutral oil, with a splash of toasted sesame oil
1/3 cup rice wine vinegar
1/2 teaspoon Dijon mustard
Shred the vegetables and toss them in vinaigrette. Even better after a couple of hours in the fridge. A shredded carrot is nice in this salad, too.
Ham + Potato Frittata
Here's how we make it.